Using Inject JS Script Activity in UiPath
. 9 mins read

What is Inject JS Activity?
Inject Js Activity in UiPath executes JavaScript code in the context of the webpage corresponding to a UiElement. In my view, Inject Js is one of the most overlooked activities in UiPath. With a basic understanding of JavaScript, you can do various actions on a web page.
I will attempt to explain the activity using some sample scenarios.
Sample Scenario - Data scraping using JavaScript
Consider we have a software download page and we need to obtain some metrics around the number of downloads. The page provides different packages of the same software (exe, zip and rar).
We will use the download page of Change Case Excel Add-In , a software developed by me. The download count changes each time someone downloads the software as it uses GitHub API to track downloads.
We need to obtain the following details from the page.
- Total number of downloads.
- Get the value when element
idis passed as an input parameter. - Details of a particular file type
- File type info.
- File name.
- Number of downloads.
We will take a step-by-step approach to deal with this scenario.
Setup a new project in UiPath
Let us begin by creating a project in UiPath.
Create a new UiPath project named
Inject Js Script Activityor a name that you like.I have selected
C#as the language of choice. The content of this tutorial should work fine withVBalso.In the Main Workflow, let us add some activities to launch the desired site.
Add
open browseractivity withUrl:https://github.aneejian.com/Change-Case-Excel-Add-In/download/andBrowserTypeChrome. (you can select a browser of your choice)Inside the
open browseractivity add adelay activityof 5 seconds. (This is to handle this particular site. As the animations might interfere. Idea is to wait until the page is loaded. You can useelement existsactivity also.)
Let the browser window with the download page stay open throughout our entire exercise.
Get Total Downloads
Let us start with total downloads.
Step 1 - Find element properties
Find the properties by which we can identify the element.
We can use the Chrome inspection tool to identify properties of an element.
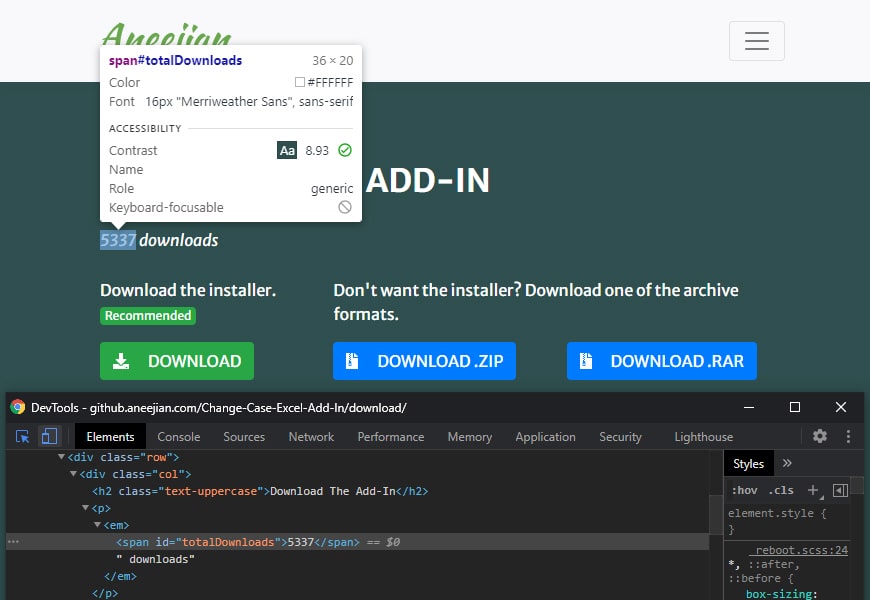
As you can see from the image, the total downloads is kept inside a span with id totalDownloads.
This means, we have to get the innerText of an element with id totalDownloads from the page.
Step 2 - Creating the JS file
Write the JavaScript and save it as a file.
To get an element with a particular ID, we could use the JavaScript code document.getElementById("totalDownloads")
function getTotalDownloads() {
  var totDownloads = document.getElementById("totalDownloads");
  return totDownloads.innerText;
}
Create a JavaScript file with the code above. Let us name it getTotalDownloads.js.
Save the file to the js folder inside the UiPath project.
Note: There is no need to keep the function name and the file name same. We used it to keep things simple.
Step 3 - Create workflow in Uipath
Create a new workflow Get Total Downloads.
Add the following activities to it.
Add
attach browseractivity and indicate the download window opened by running theMainworkflow.Now insert our star
Inject Js Scriptactivity.Find an element to insert JS to.
Bodytag of the page is preferred for this.For the input
ScriptCodegive the pathjs\\getTotalDownloads.jsTo store the output
ScriptOutputadd a variable.Add a log message or write line activity to validate the output.
Run the code and validate the output.
Get value by passing a parameter
Now let us try passing a parameter to the JavaScript and get the corresponding value.
Step 1 - Create JS file
Add the following code to a JavaScript file named getValueByParameter.js and save inside the js folder of the project.
function getValueByParameter(e, elementId){
    return document.getElementById(elementId).innerText;
}
The first parameter
e(name can be anything) in the function is important. That is how the inserted JS knows that there are parameters passed from UiPath.
Step 2 - Create workflow in UiPath
Create a new workflow Get Value by Parameter.
- Add the same activities we added before.
- Attach browser
- Inject Js Script
- Log Message
- For inject JS set the path to
js\\getValueByParameter.js. - Let us find the total number of
exefile downloads. To get that, give theInputParameterof inject js activity asexeDownloads. - Run the code and validate the output.
- Try passing other elements ids as inputs and validate
- zipDownloads
- rarDownloads
- zipName
Details of a particular file type
Until now, we were returning a single value. Let us see how we can return multiple values.
The UiPath activity restricts us to return only a string value out of Inject Js Script activity. However, we can return a JSON string with multiple properties.
If you observe the download page, you can see 3 file types for download
- Win32 Cabinet Self-Extractor
- ZIP archive
- RAR archive
Step 1 - Create JavaScript file
Add the following code to a JavaScript file named getFileTypeDetails.js and save inside the js folder of the project.
function getFileTypeDetails() {
  var fileDetails = {
      exe: {
        type: document.getElementById("exeType").innerText,
        name: document.getElementById("exeName").innerText,
        downloads: document.getElementById("exeDownloads").innerText,
      },
      zip: {
        type: document.getElementById("zipType").innerText,
        name: document.getElementById("zipName").innerText,
        downloads: document.getElementById("zipDownloads").innerText,
      },
      rar: {
        type: document.getElementById("rarType").innerText,
        name: document.getElementById("rarName").innerText,
        downloads: document.getElementById("rarDownloads").innerText,
      },
    };
  return JSON.stringify(fileDetails);
}
Step 2 - Create UiPath workflow
Create a new workflow Get File Type Details.
- Add the same activities we added before.
- Attach browser
- Inject Js Script
- Log Message
- For inject JS set the path to
js\\getFileTypeDetails.js. - Run the code.
This will give you a JSON string like below.
{
  "exe": {
    "type": "Win32 Cabinet Self-Extractor",
    "name": "change_case_excel_addin.exe",
    "downloads": "4216"
  },
  "zip": {
    "type": "ZIP archive",
    "name": "change_case_excel_addin.zip",
    "downloads": "812"
  },
  "rar": {
    "type": "RAR archive",
    "name": "change_case_excel_addin.rar",
    "downloads": "309"
  }
}
Now you can use the JSON activity in UiPath to
deserialize the JSON string
and extract the required data.
Click here to read an article on using JSON activities in UiPath.
Step 3 - Modify script to return details of specific file type
Now the script gives us information of all the file types. While we can parse the JSON output and get the desired data, let us try to do it with the activity itself.
Make a minor modification to the JavaScript code.
function getFileTypeDetails(e, fileType) {
  var fileDetails = {
    exe: {
      type: document.getElementById("exeType").innerText,
      name: document.getElementById("exeName").innerText,
      downloads: document.getElementById("exeDownloads").innerText,
    },
    zip: {
      type: document.getElementById("zipType").innerText,
      name: document.getElementById("zipName").innerText,
      downloads: document.getElementById("zipDownloads").innerText,
    },
    rar: {
      type: document.getElementById("rarType").innerText,
      name: document.getElementById("rarName").innerText,
      downloads: document.getElementById("rarDownloads").innerText,
    },
  };
  return JSON.stringify(fileDetails[fileType]);
}
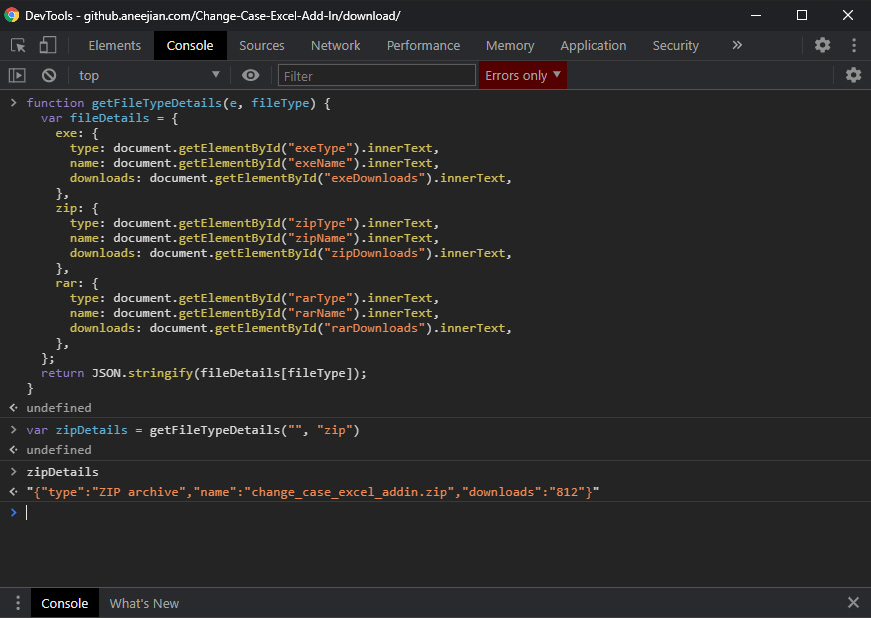
Now the JavaScript accepts an input parameter. Passing input parameter as exe or zip or rar will provide you details of each file type.
For example, if we pass rar to the function, it will give the following JSON string.
{
  "type": "RAR archive",
  "name": "change_case_excel_addin.rar",
  "downloads": "309"
}
Sample Scenario - Data entry using JavaScript
Now let us try to fill data into an html form. We have a test page where you can enter the feedback on a form.
About the form
The form is a mockup HTML page and the data entered is not posted or saved anywhere.
Form URL: https://aneejian.com/helpers/uipath-inject-js-form.html
- Form contains 3 fields
- A text box to enter your name.
- Radio button with options
yesandnoto indicate whether you liked this post. - A text area where you can enter feedback.
- A button to submit
Clicking submit just shows an alert with the data you entered.
Step 1 - Create the JS file
Create a JavaScript file named submitForm.js in the js folder of our UiPath project.
function submitForm(e, inputFormData){
    var formData = JSON.parse(inputFormData);
    document.getElementById("name").value = formData.input_name;
    document.getElementById("feedback").value = formData.input_feedback;
    if (formData.input_liked == true) {
        document.getElementById("radio_0").click()
    }
    else{
        document.getElementById("radio_1").click()
    }
}
As you can see, the code above accepts an input, formData. Since we have multiple inputs to be provided, we have to pass the data as a JSON string.
{
  "input_name": "Raul",
  "input_liked": true,
  "input_feedback": "I have understood the basic concepts of Inject Js Activity in UiPath."
}
The first line in the JavaScript code (
var formData = JSON.parse(inputFormData);) parses the input JSON. So we need to ensure that the elements in the input JSON matches the expected elements by the code. i.e.input_name,input_likedandinput_feedback.
If you want to click the submit button after entering form information, add the following line to the js file just before closing the function submitForm.
document.querySelector("button[name='submit']").click()
In the code above, we have used a different selector to click on Submit button. We are looking for an element with button tag having the name submit.
See how it appears when we inspect the element. There is no id attribute, so we are using another unique attribute to identify the element.
<button name="submit" type="submit" class="btn btn-primary" onclick="showResponse()">
    Submit
</button>
Step 2 - Create workflow
I am not explaining this step in detail. You know how to do it.
- Open the test form URL with UiPath in a browser.
- Inject the above JS file.
- Run the process and validate the output.
Testing your JavaScript code
Before trying your JavaScript codes from UiPath, you should test and confirm that it is working fine. This will help in easy debugging. To test your JavaScript codes, you can use developer tools available in all major browsers.
Let us see how to do it in Google Chrome.
- Open Google Chrome browser and navigate to the desired site. In our case, the download page.
- While on the page, click
F12. - This will launch Google Chrome dev tools.
- Click the console tab.
- Enter your code an test.
Using JQuery
In this tutorial, I have used vanilla JavaScript. You can use JQuery also. However, you need to ensure that JQuery is supported by the site into which you are inserting the code.
Best Practices
- Test your JavaScript using browser console tools and ensure it is working fine before implementing it in UiPath.
- Keep your JavaScript in separate
jsfiles. This will help in maintenance and avoid difficulties while trying to add JavaScript as string in UiPath. - Whenever possible, inject JavaScript to the body element of a web page.
- If your webpage has an IFrame and you want to get data from inside the IFrame, inject the JavaScript to an IFrame element. As of writing this article, UiPath is not able to identify elements inside an IFrame when using Google Chrome. It works fine with Internet Explorer.
- When using JavaScript for entering form data, ensure that your submission is accepted. On some sites, only a simulated entry work.
Some scripts you can try
Print a web page
function PrintPage(){
   window.print();
}
Get all hyperlinks in a web page
function getLinks() {
  var urls = document.getElementsByTagName("a");
  var links = [];
  for (let index = 0; index < urls.length; index++) {
    const link = urls[index];
    links.push(link.href);
  }
  return JSON.stringify(links);
}
Get all images in a web page
function getImages() {
  var images = document.getElementsByTagName("img");
  var imageUrls = [];
  for (let index = 0; index < images.length; index++) {
    const img = images[index];
    imageUrls.push(img.src);
  }
  return JSON.stringify(imageUrls);
}
Source Code
View UiPath Source Code on GitHub
Useful links to learn basic JavaScript
- W3 Schools
- W3 Schools - JS HTML DOM
- JavaScript and HTML DOM Reference
- JavaScript / jQuery DOM Selectors
- CSS Selector Reference
Conclusion
Inject Js Script activity is a powerful activity. If you know basic level of JavaScript, you can easily do web scraping, form entries, button clicking etc without the need of capturing each and every element. Use it wisely and make your work easy and fast.
- RPA
Category:
- #JavaScript
- #UiPath
Tags: